The 12-Hour Science Project
Okay, it’s the eve of your science fair project deadline, you haven’t even started your project, and you’re on the brink of calling Procrastinators Anonymous… but you’ve found your way here instead. Here is our secret recipe for the world’s easiest science fair project that will take you less than 12 hours to complete, with one trip to the drug store. (To get the full-blown version (with 75-minute video) for under $10, click here.)
Shopping List:
- Foam core display board
- White copy paper
- Colored (can be construction) paper
- Fuji (white) film canisters (NOT Kodak)
- Two packages (72 tablets total) of effervescent tablets
- Measuring tape or ruler
- Photo paper for your digital camera
- Glue or double-sided sticky tape to nail down the photos and paper to the display board
- Tablespoon measure (already in your kitchen?)
- Thermometer (you probably already have this)
- Stopwatch or clock (you’ll need to count in seconds)
- Graph paper (you can make your own grid on a sheet of paper if you need to)
Your First Step: Play with the experiment first.
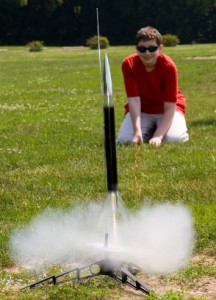
Place an effervescent tablet in a canister (you may need to break it into pieces) and fill part way with water. Working quickly, cap it and invert it on the sidewalk. Stand back… POP! You’ll find there’s an optimal water level for maximum height. If you work fast, you can get about four launches from one tablet. What happens if you try two tablets at once?
Here’s a short video so you can see what’s going on:
What’s going on? The tablets contain sodium bicarbonate (baking soda) and citric acid (a solid form of vinegar). What happens when you mix together vinegar and baking soda? It fizzes all over the place, doesn’t it? Note that this reaction takes place because the vinegar (acetic acid) is in a liquid state. Notice how the effervescent tablets contain both chemicals, but they don’t react until you get them wet.
The chemical reaction of sodium bicarbonate and citric acid generates gas carbon dioxide gas bubbles (the same molecule you burp after chugging an entire soda), and those bubbles foam up and out of the canister. When you cap it, there’s no room for the bubbles to go, and they build up pressure… and more pressure… and more pressure… until POP! There’s so much pressure that the canister just can’t hold it together anymore, and off flies the cap (or the canister, if you’re doing it upside-down).

Formulate your Question or Hypothesis: You’ll need to nail down ONE question or statement you want to test if it is true. Be careful with this experiment – you can easily have several variables running around and messing up your data if you’re not mindful. Here are a few possible questions:
- Do more tablets give a higher flight?
- Does more water give a higher flight?
- Does less water give a higher flight?
Once you’ve got your question, you’ll need to identify the control and the variable. For the question: “Does more water give a higher flight?”, your control would be one tablet, and your variable is the amount of water.
Taking Data: Sticking with the Question “Does more water give a higher flight?”, here’s how to take data. Grab a sheet of paper, and across the top, write down your background information across the top of the paper, such as your name, date, time of day, weather (and wind conditions), size of tablet (in weight, or grams – check the box), water temperature (in degrees), and anything else you’d need to know if you wanted to repeat this experiment exactly the same way on a different day.
Then get your paper ready to take data… and write across your paper these column headers, including the things in ( ):
- Trial #
- Water (teaspoons)
- Time to Launch (seconds) <– Note: This is the time it takes for the rocket to pop after you’ve capped it.
- Maximum Altitude (feet)
Run your experiment starting with no water… while this seems pointless, you still need to test and see what happens. Plus, this is an excellent time to pull out your camera and get a good photo of you doing your experiment (you’ll use this later on your display board). Run your experiment again and again, increasing the water amount by one teaspoon each time until you reach the volumetric limit of your film canister. Be sure to use a fresh tablet EACH TIME, or you’ll also be varying the amount of fuel in this experiment also. Don’t forget to take photos as you go along – see if you can get a picture of the rocket actually blasting off the ground!
NOTE: Kodak (black) canisters will NOT work for this experiment!! Record your results.

Analyze your data. Time to take a hard look at your numbers! Make yourself a grid (or use graph paper), and plot the Altitude Height (in feet) versus the Water Amount (in tsp). In this case, Water Amount goes on the horizontal axis, and Altitude does on the vertical axis). You can make a second graph showing the Altitude (feet) and Time to Launch (seconds).
For more advanced students, use your projectile motion equations from physics to check your measurements against your theoretical values. Major bonus points!
Conclusion: So – what did you find out? What water amount gives you the highest altitude? Is it what you thought originally? Science is one of the only fields where people actually throw a party when stuff works out differently than they expected! That’s because scientists are really investigators, and they get really excited when they get to learn something new.
One of the biggest mistakes you can ever make is to fudge your data so it matches what you wanted to have happen. Don’t ever be tempted to do this… science is based on observational fact. Think of it this way: the laws of the universe are still working, and it’s your chance to learn something new!
Recommendations: Okay, so this is where you need to come up with a few ideas for further experimentation. If someone else was to take your results and data, and wanted to do more with it, what would they do? Here are a few spins on the original experiment… your recommendations don’t need to be this crazy…
Add foam fins and a foam nose, hot glued into place (foam doesn’t mind getting wet, as paper does).Put the fins on at an angle and watch it spin as it flies upwards. You can also tip it sideways and add wheels for a rocket car. Stack them high for a multi-staging project, or strap three together with tape and launch them at the same time! You can also try different containers using corks instead of lids.
What other chemicals do you have which also produces a gas during the chemical reaction? Chalk and vinegar, baking soda, baking powder, hydrogen peroxide, isopropyl alcohol, lemon juice, orange juice…
Make the dislpay. Fire up the computer, stick paper in the printer, and print out the stuff you need for your science board. Here are the highlights:
- Catchy Title: This should encompass your basic question (or hypothesis).
- Purpose and Introduction: Why study this topic?
- Results and Analysis (You can use your actual data sheet if it’s neat enough, otherwise print one out.)
- Methods & Materials: What did you use and how did you do it? (Print out photos of you and your experiment.)
- Conclusion: One sentence tells all. What did you find out?
- Recommendations: For further study.
- References: Who else has done work like this? (Wernher von Braun, Robert Goddard, etc.)
For tips & tricks on making your exhibit board, click here.


Josh Maxwell Said,
December 18, 2008 @ 1:00 am
I found your blog on google and read a few of your other posts. I just added you to my Google News Reader. Keep up the good work. Look forward to reading more from you in the future.